

Overview of Metal Roof Installation
Metal roofs are an excellent choice for durability, energy efficiency, and longevity. However, to ensure optimal performance, it’s essential to install proper underlayment before laying down the metal roofing panels. Roof underlayment acts as an extra layer of protection, preventing water infiltration, providing thermal insulation, and safeguarding the roof structure. In this guide, we’ll walk you through how to install roof underlayment for a metal roof, ensuring the protection and longevity of your roofing system.

Rodyben7 Construction LLC- Roofing & Siding
StratfordGreater Bridgeport Planning RegionConnecticut
Headquarter Office, 197 Victory St, Stratford, CT 06615, USA
Why Roof Underlayment is Crucial for Metal Roofs
While metal roofs are known for their durability and resistance to the elements, underlayment serves a critical role in adding an extra layer of protection. Here's why installing the right underlayment is crucial:
Arya Roofing & Contracting
LexingtonMiddlesex CountyMassachusetts
5 Wright St, Lexington, MA 02420, USA
1. Moisture Protection
The primary function of underlayment is to prevent water from getting underneath the metal roofing. It acts as a barrier against rainwater, snow, and ice. Without proper underlayment, moisture can seep into the structure, causing mold, rot, and deterioration of the roof deck over time.
2. Enhanced Insulation
Roof underlayment also helps with thermal insulation, keeping your home cooler in the summer and warmer in the winter. This added insulation reduces energy costs and increases the comfort inside the building.
3. Protection from Wind and Debris
Wind-driven rain, debris, and high winds are a common threat to metal roofs. Underlayment provides an additional protective layer to prevent any damage that may occur when the roofing panels shift or experience wear over time.
Materials Needed for Metal Roof Underlayment
Before beginning the installation process, gather the following materials to ensure a smooth and efficient underlayment installation:
1. Metal Roof Underlayment
For metal roofs, choose a high-quality synthetic underlayment. Synthetic underlayment is ideal because it’s durable, lightweight, and water-resistant, offering superior performance compared to traditional felt underlayment.
2. Roofing Nails
Galvanized or stainless steel nails are needed to secure the underlayment. They should be long enough to penetrate the decking and hold the underlayment in place, while also being resistant to rust and corrosion.
3. Roof Decking (OSB or Plywood)
Ensure that your roof decking is solid and in good condition. If the decking shows signs of damage or wear, replace it before applying the underlayment to prevent future issues.
4. Flashing
Flashing materials, such as aluminum or copper, are necessary for sealing edges, valleys, and around roof penetrations like chimneys or vents. Flashing ensures that water doesn’t seep into areas where the roofing material meets other structures.
5. Stapler or Pneumatic Stapler
A pneumatic stapler can help speed up the installation process, especially for large roof surfaces, ensuring the underlayment is applied efficiently and securely.
Step-by-Step Guide to Installing Roof Underlayment for Metal Roof
Follow these steps for proper installation of roof underlayment for your metal roof:
1. Prepare the Roof Decking
Before applying the underlayment, ensure that the roof decking is clean, dry, and free from debris. Check for any damaged or deteriorating decking and replace any compromised areas to create a solid base for the underlayment.
2. Roll Out the Underlayment
Start at the bottom edge of the roof and unroll the synthetic underlayment horizontally. Make sure the underlayment runs parallel to the eaves, and ensure that each roll overlaps the previous one by at least 4 inches to prevent water from seeping through seams.
3. Secure the Underlayment
Fasten the underlayment using roofing nails or staples. Place the nails or staples at regular intervals—usually 12 inches apart along the edges and 18 inches in the center of each roll. Ensure the nails are not driven too deeply, as this can cause the underlayment to tear or wrinkle.
4. Install Flashing
Flashing should be applied along the roof edges, in valleys, and around roof penetrations. This will provide a watertight seal that further protects your roof from water infiltration. Ensure the flashing overlaps the underlayment and is securely fastened to the roof decking.
5. Continue Layering
Repeat this process for additional layers of underlayment, ensuring that each layer overlaps the previous one. When working on steep roofs, it's essential to maintain the correct orientation and overlap to ensure water flows properly off the roof.
Common Mistakes to Avoid During Installation
While installing roof underlayment for a metal roof is a straightforward task, there are a few common mistakes that can lead to problems later on:
1. Inadequate Overlap
Failing to properly overlap the underlayment can lead to leaks over time. Make sure each roll of underlayment overlaps the previous one by at least 4 inches, and avoid any gaps in the seams.
2. Incorrect Fastening
Using improper fasteners or placing them too far apart can cause the underlayment to shift or tear. Be sure to use the correct type of fasteners and place them at regular intervals to secure the underlayment properly.
3. Skipping Flashing
Neglecting to install flashing or doing so incorrectly can allow water to seep through vulnerable areas, causing damage to your home. Always install flashing at critical points like roof edges, valleys, and around roof penetrations.
Real-Life Stories and Installation Experiences
One homeowner, Mark, shared how he had installed a metal roof himself and ran into issues with the underlayment not being properly overlapped. This caused a slow leak during the first rainstorm after installation. Mark advises homeowners to double-check the underlayment’s overlap and ensure that it's installed securely before proceeding with the metal panels.
Final Thoughts on Installing Roof Underlayment for Metal Roofs
Installing roof underlayment for a metal roof is essential to ensure your roof’s performance and longevity. With proper installation, underlayment adds an extra layer of protection against water damage, improves insulation, and safeguards your home from the elements. By following the step-by-step guide and avoiding common mistakes, you can install your roof underlayment with confidence. For the best roofing materials and expert advice, visit 【BeachCo Roofing Hub】 to find high-quality products and services tailored to your needs.


 Garcia Family Roofing LLC4.0 (14 reviews)
 ML Envision Construction LLC5.0 (14 reviews)
 Aetna Roofing4.0 (8 reviews)
 Home Expert Roofing & Waterproofing5.0 (2 reviews)
 Anne Arundel Exteriors5.0 (1 reviews)
 Prime Renovations NJ5.0 (7 reviews)
 How to Choose a Roof Color for a House with Dark Siding – BeachCo Roofing Hub
 The Best Roofing Materials for a Cottage or Vacation Home
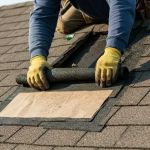 How to Repair a Roof Leak from a Rooftop Greenhouse or Garden Structure
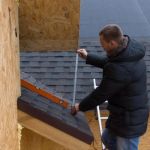 How to Calculate Roof Pitch: A Simple Guide for Homeowners
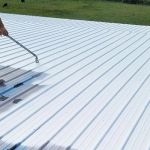 The Lifespan of Roof Coatings: How Often They Need to be Reapplied
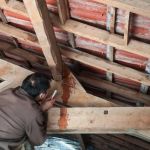 How to Repair a Roof Leak in a Building with a Seamless Metal Roof