
- 1. Understanding Roof Leaks Around Plumbing Vents
- 2. Tools and Materials Needed for Repair
- 3. Step-by-Step Guide to Repairing the Leak
- 4. Common Mistakes to Avoid When Repairing Roof Leaks
- 5. How to Prevent Future Roof Leaks Around Plumbing Vents
1. Understanding Roof Leaks Around Plumbing Vents
Roof leaks around plumbing vents are a common issue that can lead to significant water damage if left untreated. These leaks typically occur at the point where a plumbing vent pipe extends through the roof. Over time, flashing around the vent can deteriorate, or roofing material may wear out, allowing water to seep into your home. Repairing the leak is crucial to preventing further damage, such as mold, rot, or structural issues. Let’s dive into how to identify and repair this common roof problem.

Hygrade Insulators, Inc.
PhillipsburgWarren CountyNew Jersey
54 Mercer St, Phillipsburg, NJ 08865, USA
2. Tools and Materials Needed for Repair
Before you begin repairing a roof leak around a plumbing vent, it's important to gather the necessary tools and materials. Here's a list of items you’ll need:

2.1 Basic Tools
- Ladder (ensure it’s stable and tall enough to reach the roof)
- Utility knife or roofing knife
- Caulk gun
- Hammer
- Roofing nails
2.2 Materials
- Roofing cement
- New flashing (if the existing flashing is damaged)
- Roofing tar or sealant
- Replacement shingles (if necessary)
Having these tools and materials ready will make the repair process smoother and more efficient. It’s also important to inspect the condition of your roof while you’re working on it to identify any other potential issues that might need attention.
3. Step-by-Step Guide to Repairing the Leak
Now that you have your tools and materials ready, here’s a simple step-by-step guide to repairing the roof leak around the plumbing vent:
3.1 Step 1: Inspect the Area
Before beginning the repair, carefully inspect the area around the plumbing vent. Look for any visible cracks or damage to the flashing, shingles, or roofing material. If the flashing is rusted or damaged, it will need to be replaced. If the leak is small and the flashing is intact, you can proceed with sealing the gap.
3.2 Step 2: Remove Damaged Shingles
If there are damaged shingles around the vent, remove them using your utility knife. Be careful not to damage surrounding shingles as you remove the old ones. This will expose the area where the leak is occurring, allowing you to apply the repair materials directly to the affected area.
3.3 Step 3: Apply Roofing Cement or Sealant
Once you have access to the leaking area, apply a generous amount of roofing cement or sealant around the base of the plumbing vent. Use a caulk gun to apply the roofing cement evenly and make sure it completely seals the gap between the vent pipe and the roof. For larger gaps, you may need to apply additional layers of sealant for a tight seal.
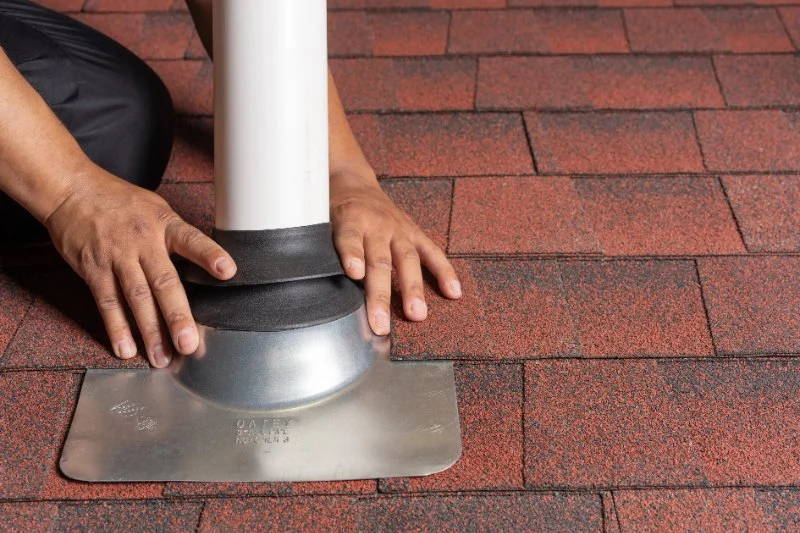
3.4 Step 4: Install New Flashing (if necessary)
If the existing flashing is damaged, remove it and replace it with new flashing. Carefully install the new flashing around the vent pipe, ensuring it’s secured tightly with roofing nails. The flashing should be positioned to direct water away from the vent pipe and into the surrounding roofing material.
3.5 Step 5: Replace Shingles
After the repair is complete, replace the shingles that were removed earlier. If necessary, install new shingles to match the existing roof. Nail the shingles securely in place, ensuring that they overlap correctly to prevent water from entering the roof.
3.6 Step 6: Inspect the Area Again
Once the shingles are replaced and the area is sealed, inspect the repair to ensure everything is in place. Check for any gaps or areas where water could potentially seep through. If everything looks good, you’ve successfully repaired the roof leak around the plumbing vent!
4. Common Mistakes to Avoid When Repairing Roof Leaks
While repairing roof leaks around plumbing vents is a manageable DIY project, there are some common mistakes to watch out for:
4.1 Not Using Enough Sealant
One of the most common mistakes is not applying enough sealant. Make sure to cover all gaps thoroughly and apply a generous amount of roofing cement around the vent. Insufficient sealant may lead to future leaks.
4.2 Skipping the Flashing Inspection
Don’t skip the inspection of the flashing. If the flashing is rusted, damaged, or cracked, it needs to be replaced. Reusing old, damaged flashing may lead to more leaks down the line.
4.3 Ignoring Roof Ventilation
Ensure that your roof is properly ventilated to prevent moisture buildup. Poor ventilation can lead to mold and mildew growth, which can worsen the problem over time.
5. How to Prevent Future Roof Leaks Around Plumbing Vents
To prevent future leaks around your plumbing vent, consider the following tips:
5.1 Regular Roof Inspections
Schedule regular roof inspections to identify any potential issues before they become significant problems. Look for damaged shingles, cracked flashing, or gaps around vent pipes.
5.2 Maintain Proper Ventilation
Ensure your roof is properly ventilated to prevent moisture buildup that could lead to leaks. Check attic vents and ensure they are clear of debris and functioning properly.
5.3 Replace Damaged Roofing Materials Promptly
If you notice any damage to your roof, whether it's shingles, flashing, or sealant, address it promptly to prevent leaks. Regular maintenance can help extend the lifespan of your roof and avoid costly repairs in the future.
For professional assistance or to get the best roofing materials for your home, visit BeachCo Roofing Hub for expert advice and product recommendations.


 Riley Roofing5.0 (176 reviews)
 Ruff Roofers4.0 (242 reviews)
 NYC Supreme Roofing Construction Corp5.0 (1 reviews)
 BRAX Roofing4.0 (429 reviews)
 CARRIER ROOFING SIDING & WINDOWS5.0 (64 reviews)
 J. Salvatore & Sons Roofing- CT5.0 (11 reviews)
 The Best Roofing Materials for an Industrial Style Loft
 The Cost of a New Roof with a 50-Year Warranty: What You Need to Know
 The Lifespan of a Roof in an Area with Frequent Temperature Swings | BeachCo Roofing Hub
 How to Install a Roof Cricket Behind a Rooftop Mechanical Screen: A Step-by-Step Guide
 How to Repair a Roof Leak Around a Plumbing Vent
 The Benefits of a Roofing Manufacturer's Approved Installer Program