
How to Install Roof Snow Guards on a Tile Roof
- 1- Introduction to Roof Snow Guards
- 2- Why Snow Guards Are Important
- 3- Preparation Before Installation
- 4- Step-by-Step Installation Guide
- 5- Snow Guard Maintenance Tips
1- Introduction to Roof Snow Guards
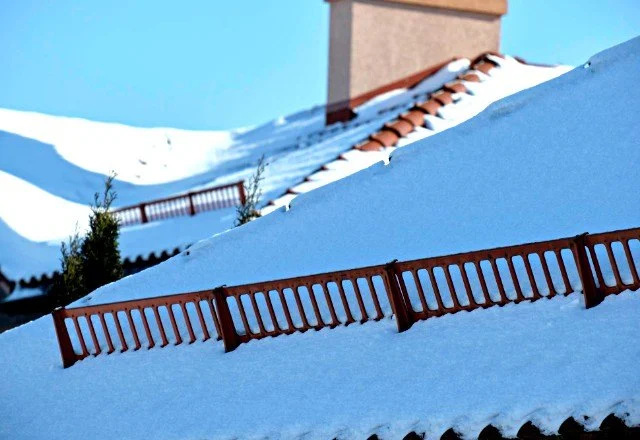
Roof snow guards are essential safety features designed to prevent large amounts of snow and ice from sliding off the roof, which could cause damage to property, vehicles, or pedestrians below. Installing snow guards on a tile roof is a straightforward process that, when done correctly, can significantly enhance the safety and functionality of your roof, especially in regions that experience heavy snowfall.
This guide will walk you through the importance of snow guards, the preparation needed, and the steps to effectively install them on your tile roof.
2- Why Snow Guards Are Important
Snow guards are designed to control the movement of snow and ice on sloped roofs, especially in areas prone to significant winter weather. Without them, the accumulated snow on your roof could slide off in large, uncontrolled amounts, potentially causing serious accidents or damage.
The benefits of installing snow guards include:
- Preventing Accidents: Snow sliding off the roof can cause injury to people below, damage vehicles, and destroy landscaping. Snow guards hold the snow in place, preventing it from falling.
- Protecting Property: Without snow guards, sliding snow can damage windows, gutters, and even the structure of the roof itself.
- Reducing the Risk of Ice Dams: Snow guards help prevent the formation of ice dams, which can block gutters and cause water to back up under shingles, leading to leaks and water damage.
3- Preparation Before Installation
Before installing snow guards on your tile roof, it's important to ensure you have the right tools and equipment. Here’s what you will need to prepare:
- Snow Guards: Choose snow guards that are compatible with tile roofing. They come in various materials such as aluminum, stainless steel, and plastic, so pick the one that best suits your roof's aesthetic and durability needs.
- Measuring Tools: A tape measure or ruler is essential for determining the spacing between each snow guard to ensure an even and effective installation.
- Power Tools: A drill with appropriate drill bits is necessary for creating holes in the tiles to secure the snow guards.
- Sealant: Depending on your roof's condition and the type of snow guard, you might need a roofing sealant to prevent water leakage around the installation points.
Once you’ve gathered the necessary materials and tools, it’s important to check the weather forecast and choose a clear, dry day for installation.
4- Step-by-Step Installation Guide
Installing snow guards on a tile roof requires precision to ensure they are effective and secure. Follow these steps for a successful installation:
- Step 1: Measure the Roof
Use a tape measure to determine the spacing between the snow guards. Generally, snow guards should be installed 24 to 36 inches apart, but this may vary based on your roof's pitch and local snow conditions. - Step 2: Mark the Installation Points
Mark the locations where each snow guard will be installed, ensuring that they are evenly spaced along the roof's length. - Step 3: Drill Holes in the Tiles
Using a power drill with a ceramic or masonry bit, drill carefully into the tile at the marked locations. Be sure not to crack the tiles while drilling. - Step 4: Install the Snow Guards
Align the snow guards with the drilled holes and secure them using screws or fasteners designed for tile roofs. If needed, apply roofing sealant around the fasteners to prevent leaks. - Step 5: Inspect the Installation
After all snow guards are installed, inspect each one to ensure they are securely attached and positioned correctly. Double-check that the guards are not obstructing the roof's drainage system.
5- Snow Guard Maintenance Tips
Regular maintenance is essential to ensure your snow guards continue to perform well throughout the winter. Here are some maintenance tips:
- Inspect the Snow Guards Annually: Check the snow guards each year, especially before the snow season begins, to ensure they are securely fastened and free from debris.
- Clear Snow and Ice: After a heavy snowstorm, remove any built-up snow or ice from the snow guards to maintain their functionality.
- Check for Damage: Inspect the tiles and snow guards for signs of wear, cracks, or damage. If any damage is found, repair or replace the affected tiles and guards.
Proper maintenance will help prolong the life of your snow guards and ensure that they continue to protect your roof for many winters to come.


 Rose Construction4.0 (95 reviews)
 Affordable Roofing Inc5.0 (50 reviews)
 Valor Home Roofing4.0 (125 reviews)
 Value Remodeling, Inc.4.0 (11 reviews)
 DC Generals4.0 (235 reviews)
 Rooftop Warriors LLC4.0 (95 reviews)
 The Cost of Roof Replacement in Different US Regions: What You Need to Know
 Best Practices for Choosing the Right Roofing Underlayment for Cold Climates
 The Best Roofing Materials for a Barndominium or Pole Barn
 What is a Roofing Nail Gun and How to Use It Safely
 The Lifespan of a Roof Under Constant Freeze-Thaw Cycles – Key Factors to Consider
 How to Install Roof Flashing on a Roof with Unconventional Shapes and Angles