
- 1-Why Roofing Felt is Essential for Your Roof
- 2-Tools and Materials You’ll Need for Installation
- 3-Preparing Your Roof for Roofing Felt Installation
- 4-Step-by-Step Guide to Installing Roofing Felt Underlayment
- 5-Common Mistakes to Avoid When Installing Roofing Felt
1. Why Roofing Felt is Essential for Your Roof
Roofing felt underlayment plays a vital role in protecting your home from the elements. It acts as a secondary barrier between the roof deck and the outer roofing materials (such as shingles, tiles, or metal panels). Roofing felt helps prevent water from penetrating into the house by providing an extra layer of protection against moisture. It also enhances the longevity of the roof, preventing damage from wind, snow, rain, and even extreme temperature variations.
Not only does roofing felt protect your home from leaks, but it also serves as a cushion, reducing the risk of damage to your roof from sharp objects or nails during installation. In addition, roofing felt helps with the overall performance of your roof, including thermal insulation and resistance to certain environmental factors. Installing roofing felt properly ensures that your roof is durable, water-resistant, and effective for years to come.

Master Pro Roofing Sparta Township
67 Seneca Lake Rd, Sparta, NJ 07871, USA
2. Tools and Materials You’ll Need for Installation
Before you begin installing roofing felt underlayment, make sure you have all the necessary tools and materials. Here's a list of what you'll need:
- Roofing Felt: Choose a high-quality felt underlayment, typically made from fiberglass or polyester. You can opt for either asphalt-saturated felt or synthetic felt, with the latter being more durable and moisture-resistant.
- Roofing Nails or Staples: These will be used to secure the roofing felt to the roof deck. Make sure to use nails or staples designed for roofing applications.
- Utility Knife: To cut the roofing felt to the correct size and shape.
- Measuring Tape: For accurate measurements to ensure proper installation.
- Hammer or Stapler: Depending on whether you’re using nails or staples, you’ll need either a hammer or a pneumatic stapler to secure the felt.
- Ladder or Scaffold: Ensure you have a safe way to reach the roof during installation.
- Roofing Adhesive (optional): Used to provide extra stability and prevent the felt from shifting over time.
3. Preparing Your Roof for Roofing Felt Installation
Before installing roofing felt underlayment, it's essential to prepare the roof deck properly. Follow these steps to ensure the best possible installation:

3.1 Inspect the Roof Deck
Begin by inspecting the roof deck for any damage, mold, or rot. Ensure that the surface is clean, dry, and free of debris. If there are any damaged areas, repair them before proceeding with the installation. A smooth, stable deck is crucial for securing the roofing felt and preventing leaks in the future.
3.2 Install Drip Edge (Optional)
It’s a good idea to install a drip edge along the edges of the roof to guide water off the roof and away from the deck. The drip edge helps protect against water damage and improves the overall efficiency of the roofing system.
3.3 Measure and Plan
Measure the roof’s width and length to determine how much roofing felt you’ll need. It’s always a good idea to order extra material, as mistakes can happen during installation. Plan the layout of the felt so that it overlaps at the seams, ensuring the water flows in the right direction and doesn’t seep through.
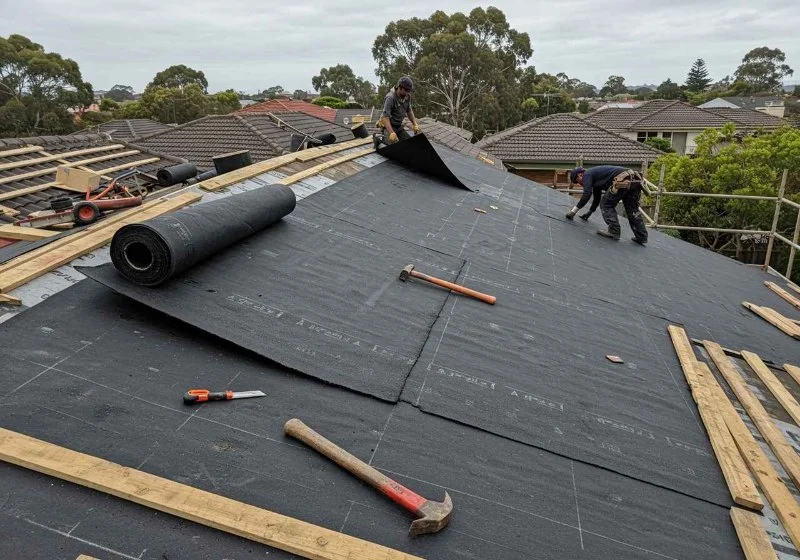
4. Step-by-Step Guide to Installing Roofing Felt Underlayment
Now that you're prepared, follow this step-by-step guide to correctly install roofing felt underlayment:
4.1 Roll Out the Roofing Felt
Start at the eaves (the bottom edge of the roof) and unroll the roofing felt horizontally along the roof deck. Make sure that the felt is aligned properly and lies flat. For added protection, ensure that the felt overlaps by about 4-6 inches on the seams. This overlap will help prevent water from seeping through the gaps between the layers.
4.2 Secure the Felt
Use roofing nails or staples to secure the roofing felt to the roof deck. Place nails or staples every 4 to 6 inches along the top edge of the felt to ensure it stays in place. Make sure that the nails or staples go through the felt and into the decking beneath, but be careful not to tear the material.
4.3 Repeat the Process
Continue unrolling and securing the felt along the roof, working your way upward. Ensure each row overlaps the previous row by at least 4 inches to create a waterproof barrier. The final layer of felt should be tucked under the ridge of the roof to provide a seamless protective layer across the entire surface.
4.4 Cut and Fit Around Obstacles
If there are any obstacles such as chimneys, vents, or skylights, cut the roofing felt carefully to fit around them. Be sure to overlap the edges of the felt around these areas for extra protection. You can use a utility knife to make precise cuts and adjustments.
5. Common Mistakes to Avoid When Installing Roofing Felt
While installing roofing felt is relatively simple, there are a few common mistakes that homeowners and DIYers should avoid to ensure a successful installation:
5.1 Not Overlapping the Felt Properly
One of the most common mistakes is failing to properly overlap the roofing felt at the seams. This can lead to water infiltration and eventual roof damage. Make sure to overlap the felt by at least 4-6 inches for each layer, especially at seams and edges.
5.2 Skipping the Fastening Process
Another mistake is not securing the roofing felt tightly enough. If the felt is not fastened properly, it can shift or become loose over time. Make sure to place nails or staples every 4-6 inches along the edges, particularly at the top, to prevent this from happening.
5.3 Installing Over Wet or Damaged Decking
Installing roofing felt over wet or damaged decking can lead to poor adhesion and a less effective barrier against water. Always ensure that the roof deck is dry and in good condition before installing the felt.
By following these steps and avoiding common mistakes, you can ensure that your roofing felt underlayment is installed correctly and provides maximum protection for your roof. If you're unsure about installing the felt yourself, or if you need high-quality materials, visit BeachCo Roofing Hub for expert guidance and the best roofing products on the market.


 Global Roofing & Siding5.0 (25 reviews)
 Local Roofing Contractor Pros5.0 (12 reviews)
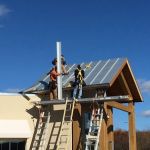 Mario Lallier LLC3.0 (5 reviews)
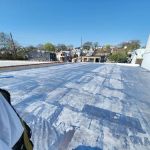 Four R Contracting LLC5.0 (6 reviews)
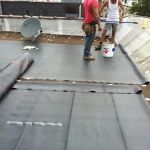 Daniele Construction LLC5.0 (11 reviews)
 Paddy's Roofing, Siding, Chimney's and more!4.0 (217 reviews)
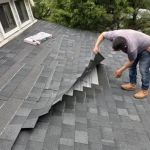 How to Repair a Roof Leak from a Rooftop Observatory or Dome
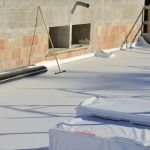 The Pros and Cons of a Fully Adhered Roof Membrane vs. Mechanically Fastened Roof Membrane
 Roofing Project Milestone Payment Schedule: Standard Practices
 How to Choose a Roofing Contractor Active in Industry Associations – A Guide for Homeowners
 The Importance of Roof Ventilation: How It Prevents Mold and Lowers Energy Bills | BeachCo Roofing Hub
 Best Roofing Materials and Costs for 2024 – Complete Guide