

- What is a Roof Cricket and Why You Need It
- Tools and Materials Needed for Installing a Roof Cricket
- Steps to Install a Roof Cricket on a Flat Rubber Roof
- Maintaining Your Roof Cricket for Long-Term Effectiveness
What is a Roof Cricket and Why You Need It
A roof cricket, also known as a saddle, is a small, sloped structure installed on a flat roof to direct water away from critical areas like chimneys, vents, and roof valleys. When water accumulates on a flat roof, it can lead to leaks and structural damage. Installing a roof cricket helps with proper drainage and prevents water from pooling in vulnerable areas, ensuring the longevity of your roof.
In this article, we will guide you through the process of installing a roof cricket on a flat rubber roof, highlighting the importance of this roofing feature for water diversion and long-term maintenance.

Performance Roofing Company of Trenton
TrentonMercer CountyNew Jersey
1315 Hamilton Ave, Trenton, NJ 08629, USA
Tools and Materials Needed for Installing a Roof Cricket
Before you begin installing a roof cricket on your flat rubber roof, ensure you have the necessary tools and materials. Here is a list of what you will need:
- Roofing Adhesive: A high-quality roofing adhesive designed for rubber roofs to bond the cricket securely to the roof surface.
- Rubber Membrane: A piece of rubber membrane to match the existing roofing material for the construction of the cricket.
- Utility Knife: To cut the rubber membrane to the appropriate size for the cricket.
- Measuring Tape: To measure the dimensions of the cricket and ensure it fits perfectly with the roof’s contours.
- Roofing Primer: A primer specifically designed for rubber roofs to ensure proper adhesion of the membrane.
- Sealant: A waterproof sealant to seal the edges of the cricket and prevent leaks.
- Safety Gear: Always wear gloves and safety goggles to protect yourself from sharp tools and roofing materials.
Steps to Install a Roof Cricket on a Flat Rubber Roof
Now that you have the necessary materials and tools, it’s time to install your roof cricket. Follow these steps for a successful installation:
- Step 1: Plan the Location of the Cricket
Determine the area where water tends to accumulate, such as near chimneys, vents, or roof valleys. The cricket should be positioned to divert water away from these areas. Measure the required dimensions based on the size of the area you are working with.
- Step 2: Cut the Rubber Membrane
Using the utility knife, cut a piece of rubber membrane that is large enough to create a slope and direct water. Ensure the rubber membrane matches the thickness and material of your existing roof membrane.
- Step 3: Apply Roofing Primer
Clean the surface where the cricket will be installed and apply a layer of roofing primer. This will ensure the adhesive bonds properly to the rubber roof.
- Step 4: Attach the Cricket
Using roofing adhesive, attach the rubber membrane to the roof in the shape of a small pyramid or saddle. The sides of the cricket should slope away from the area you want to protect (e.g., chimney or vent) to direct the water flow.
- Step 5: Seal the Edges
Once the cricket is securely in place, apply waterproof sealant along the edges where the rubber membrane meets the roof to ensure a watertight seal.
- Step 6: Test the Installation
After the adhesive has dried, test the cricket by simulating rainfall with a hose. Ensure that water is flowing away from the protected areas and not pooling around the cricket.
Maintaining Your Roof Cricket for Long-Term Effectiveness
Proper maintenance is essential to ensure that your roof cricket continues to perform its function over time. Here are a few maintenance tips:
- Regular Inspections: Periodically check the cricket for any signs of damage or wear, especially after heavy rain or storms. Look for loose edges or tears in the rubber membrane.
- Clear Debris: Keep the area around the cricket free of debris, leaves, and dirt. These can clog the drainage system and prevent water from flowing freely.
- Check Seals: Inspect the waterproof sealant around the cricket regularly. If you notice any cracks or gaps, reapply the sealant to maintain a watertight seal.
By following these steps and maintaining your roof cricket, you can significantly extend the lifespan of your flat rubber roof and prevent costly water damage. For expert roofing advice and products, visit BeachCo Roofing Hub for all your roofing needs.


 Global Roofing & Siding5.0 (25 reviews)
 Local Roofing Contractor Pros5.0 (12 reviews)
 Mario Lallier LLC3.0 (5 reviews)
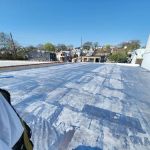 Four R Contracting LLC5.0 (6 reviews)
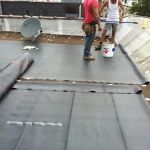 Daniele Construction LLC5.0 (11 reviews)
 Paddy's Roofing, Siding, Chimney's and more!4.0 (217 reviews)
 How to Repair a Roof Leak from a Rooftop Observatory or Dome
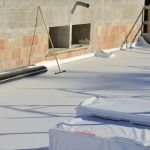 The Pros and Cons of a Fully Adhered Roof Membrane vs. Mechanically Fastened Roof Membrane
 Roofing Project Milestone Payment Schedule: Standard Practices
 How to Choose a Roofing Contractor Active in Industry Associations – A Guide for Homeowners
 The Importance of Roof Ventilation: How It Prevents Mold and Lowers Energy Bills | BeachCo Roofing Hub
 Best Roofing Materials and Costs for 2024 – Complete Guide