
- 1. Introduction to Roof Ventilation
- 2. Challenges of Installing Roof Vents in a Shallow Attic
- 3. Step-by-Step Guide to Installing Roof Vents
- 4. Choosing the Right Roof Vent for Your Attic
- 5. Maintaining Roof Vents for Optimal Performance
- 6. Recommended Products for Roof Vent Installation
1. Introduction to Roof Ventilation
Proper attic ventilation is crucial for maintaining a comfortable and energy-efficient home. Roof vents allow air to flow freely through the attic, preventing heat buildup, moisture accumulation, and potential damage to the roof structure. When you live in a house with a shallow attic space, however, installing roof vents can present unique challenges. In this guide, we’ll walk you through the steps to install roof vents effectively in a shallow attic and explain how to ensure proper ventilation for your home.

1.1 Why Roof Ventilation Matters
Good attic ventilation helps regulate temperature and moisture levels, which can extend the lifespan of your roof and reduce energy costs. Without adequate ventilation, hot air and moisture can become trapped in the attic, leading to higher cooling costs in summer and potential ice dams in winter. Additionally, excessive moisture can contribute to mold growth and rot, which can damage the roof and attic insulation.
Hale & Sons Roofing
HopkintonMiddlesex CountyMassachusetts
77 Main St suite 156, Hopkinton, MA 01748, USA
2. Challenges of Installing Roof Vents in a Shallow Attic
When you have a shallow attic space, the installation of roof vents can be more difficult. Limited space between the roof and ceiling might make it harder to access areas that need ventilation. However, with the right approach and tools, you can successfully add roof vents to your home even with a shallow attic.
2.1 Limited Space and Access
In a shallow attic, there may not be enough space to fit traditional roof venting systems like ridge vents or large gable vents. This can limit your options for installing vents that allow for efficient airflow throughout the attic. However, there are specific types of vents designed to work in smaller spaces, such as soffit vents, turbine vents, and static roof vents, which are ideal for shallow attics.
2.2 Ensuring Proper Airflow
When dealing with limited space, one of the biggest challenges is ensuring that there’s enough airflow to effectively ventilate the attic. Without proper airflow, the vents won’t be as effective in expelling heat and moisture, which defeats the purpose of installing them in the first place. Planning and choosing the right vents will help overcome this challenge.
3. Step-by-Step Guide to Installing Roof Vents
Installing roof vents can be a straightforward process if you follow the right steps. Here's a step-by-step guide to help you install roof vents on your house with a shallow attic space:
3.1 Step 1: Choose the Right Type of Roof Vent
In a shallow attic, it's important to choose roof vents that fit the space and allow for proper airflow. Common options include:
- Soffit Vents: Installed along the eaves, soffit vents allow cool air to enter the attic and push warm air out through roof vents.
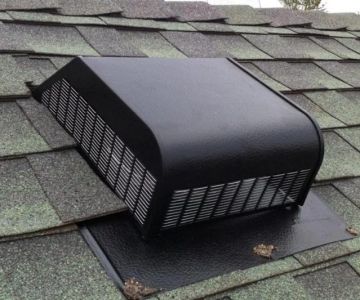
- Static Roof Vents: These are simple, non-moving vents that allow air to escape from the attic. They work well in shallow spaces.
- Turret or Turbine Vents: These rotating vents work to expel hot air and moisture, providing efficient airflow in a compact attic space.
3.2 Step 2: Measure and Mark Vent Locations
Before installing the vents, you’ll need to measure and mark where the vents will go. Start by marking spots along the roof where the airflow will be most effective, ensuring that the vents are evenly spaced. For a shallow attic, you may need to place vents closer together to maximize airflow.
3.3 Step 3: Cut Holes for the Vents
Using a saw or specialized tool, carefully cut holes in the roof where you marked for the vents. Ensure the holes are the correct size for the vents you’ve chosen. Be cautious not to cut into any supporting roof structure or wiring that could cause damage or create a safety hazard.
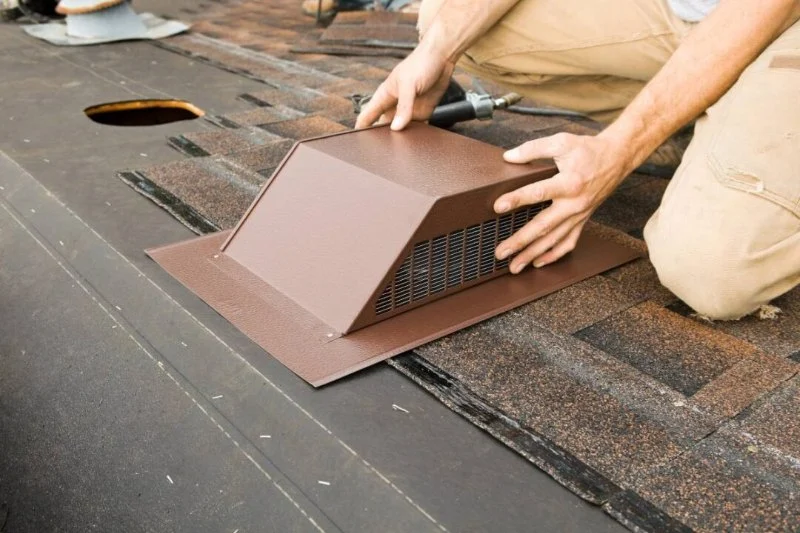
3.4 Step 4: Install the Vents
Once the holes are cut, install the vents according to the manufacturer’s instructions. For static roof vents or turbine vents, you’ll typically need to secure the vent with screws or nails. For soffit vents, you’ll need to attach them along the eaves of the roof. Make sure the vents are sealed properly to prevent leaks.
3.5 Step 5: Check for Proper Airflow
After installing the vents, it’s important to check for proper airflow. You can use a smoke test or air flow meter to ensure that air is circulating effectively through the attic. If you don’t see sufficient airflow, you may need to adjust the number or placement of your vents.
4. Choosing the Right Roof Vent for Your Attic
Choosing the right roof vent is essential to ensuring that your attic remains properly ventilated, especially when dealing with a shallow attic. Here are some important factors to consider when selecting roof vents:
4.1 Size of the Attic
The size of your attic will determine how many vents you need and what size they should be. A smaller, shallow attic may not require as many vents as a larger attic, but you still need enough vents to ensure good airflow.
4.2 Vent Type
As mentioned, different types of vents work better for shallow attics. Soffit vents and static roof vents are often the most suitable, but turbine vents can also be a good option in areas where wind can help them spin and create additional airflow.
4.3 Durability and Material
Roof vents are available in various materials such as plastic, metal, and aluminum. Choose a material that suits your home’s climate and can withstand the elements over time. Metal vents are typically more durable and can provide longer-lasting results than plastic vents.
5. Maintaining Roof Vents for Optimal Performance
Once your roof vents are installed, it’s important to maintain them properly to ensure they continue to function effectively. Regular maintenance will help prolong their lifespan and keep your attic properly ventilated.
5.1 Clean Vents Regularly
Debris such as leaves, twigs, or dust can clog roof vents over time. Clean your vents at least once a year, particularly before the summer and winter seasons, to ensure they remain unobstructed.
5.2 Inspect for Damage
Periodically inspect your vents for any signs of damage, such as cracks or rust. If you notice any issues, replace the vents promptly to prevent air leakage or further damage to the attic space.
5.3 Ensure Proper Sealing
Check the seal around the vents to ensure there are no gaps or leaks. Gaps can lead to inefficient ventilation and may allow moisture or pests to enter the attic.
6. Recommended Products for Roof Vent Installation
When installing roof vents, it’s essential to use high-quality materials for durability and performance. Here are some recommended products to consider:
6.1 Premium Soffit Vents
Consider high-quality soffit vents from brands like GAF or Owens Corning. These vents provide excellent airflow and are designed for easy installation.
6.2 Turbine Vents
Turbine vents such as those from Lomanco are effective at improving airflow in areas with limited attic space. They work especially well in areas where natural wind can help spin the turbine and expel hot air.
6.3 Roof Vent Installation Kits
If you prefer a complete installation kit, look for options from companies like BeachCo Roofing Hub. These kits provide all the necessary materials, including vents, seals, and instructions, to make the installation process easier and more efficient.
For the best roofing products and accessories, visit BeachCo Roofing Hub. We offer high-quality roof vents and installation tools to ensure your attic remains properly ventilated year-round.


 Tom Clark Roofing llc5.0 (121 reviews)
 Franklin and Templeton Roofing3.0 (7 reviews)
 Taylor Brothers Roofing5.0 (3 reviews)
 Reisch Roofing and Construction LLC5.0 (70 reviews)
 J&J Construction5.0 (3 reviews)
 Lifetime Roofing4.0 (72 reviews)
 Roof Snow Load Calculation: How to Know if Your Roof is at Risk
 How to Repair a Roof Leak in a Building with a Living Green Roof
 The Cost of Roof Replacement in Different US Regions: What You Need to Know
 Tile Roof Repair: How to Handle Cracked and Broken Tiles
 How to Install a Roof Underlayment for a Roof with Many Penetrations | BeachCo Roofing Hub
 How to Fix a Roof Leak Caused by Ice Dams