
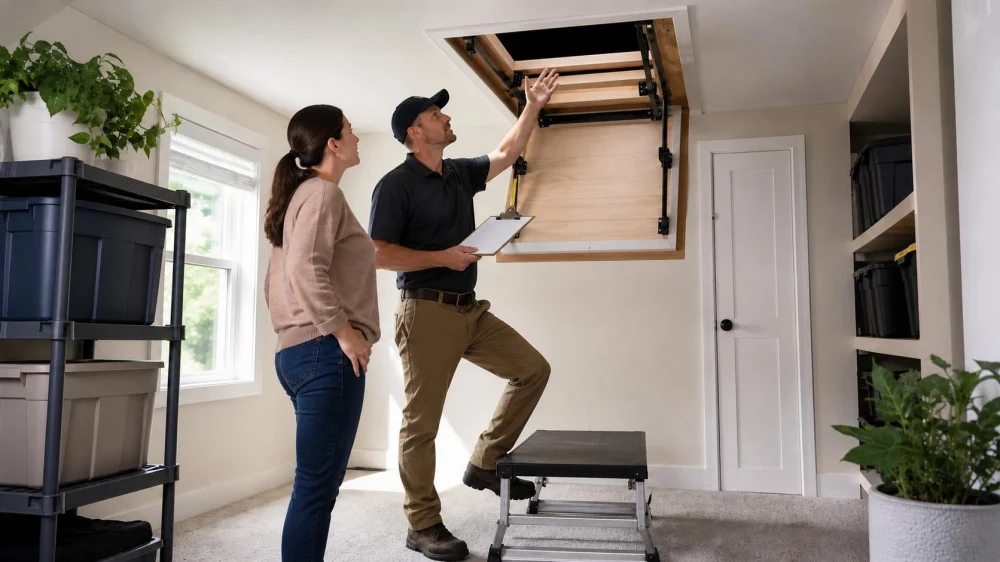
Roof Repair Attic Access: Clear the Route Before Inspection
On this page
Quick answer
Before a roof inspection or repair, ask whether the contractor needs attic access, which hatch or door will be used, how much clearance is required, and who supplies access equipment. Clear a stable route, move fragile and private items, protect floors, secure pets and children, identify known utilities or hazards, and photograph the area. Do not enter or disturb an unsafe attic yourself.
Loftus Elite Roofing & GC Services
HaddonfieldCamden CountyNew Jersey
631 Pardee Ln, Haddonfield, NJ 08033, USA
Confirm why access is needed
Attic access can help connect exterior roof conditions with interior signs, but it is not required for every task. The contractor may need to view sheathing, rafters or trusses, ventilation, insulation, stains, fasteners, penetrations, or daylight. Ask what will be inspected and whether access is visual only or may involve testing, photographs, material movement, or temporary equipment.
Identify the available hatch, pull-down stair, knee-wall door, closet panel, or mechanical-room route. Confirm its dimensions and location. Ask whether the provider accepts the existing access or will bring its own ladder, platform, lighting, protective covering, and personal protective equipment.
Put any plan to cut a new opening, move insulation, drill, remove finishes, or access another unit in writing before work. Clarify restoration and cleanup responsibility.

Clear a safe indoor route
Walk from the exterior entry to the hatch. Move loose rugs, cords, toys, low furniture, hanging decorations, plants, and breakable items. Provide enough space for people carrying tools without squeezing past shelves or valuable surfaces.
Protect finished floors and corners with materials that do not create a slipping hazard. Identify alarm systems, gate codes, parking limits, elevator rules, and restricted rooms through the contractor's arrival plan. Keep personal papers, medicines, firearms, valuables, and sensitive items secured elsewhere.
Tell occupants when the route will be active. Keep children, guests, and pets out of the work path. Do not lock a contractor inside or leave unknown workers unaccompanied contrary to the agreed access policy.
Prepare the hatch area
Clear the floor under and around the opening. Remove closet contents that could be struck by dust or a ladder. Ask who will open the hatch and contain loose insulation or debris. A ceiling hatch can release dust when moved.
Share known conditions before entry: damaged stairs, weak flooring, open framing, low clearance, extreme heat, pests, mould-like growth, vermiculite or suspect insulation, stored chemicals, exposed wiring, recent leaks, or fire damage. Do not investigate these hazards by entering the attic yourself.
Do not lay boards across joists, move electrical cables, compress insulation, or create a walking route unless a qualified person approves the method. Ceiling material between framing members may not support body weight.
Protect property and records
Photograph the access route, hatch, floor, ceiling, nearby walls, and stored items before the visit. Agree on dust containment, shoe covers, lighting, waste removal, and restoration of moved insulation or contents.
Ask what interior photographs will be taken, where they will be stored, and how private possessions will be excluded. At closeout, check the hatch, trim, ceiling, floor protection, lights, doors, and relocated items. Save inspection findings with the exterior repair record.
Access checklist
- Access purpose, location, and clearance confirmed.
- Contractor's ladder and equipment plan understood.
- Entry-to-hatch route cleared.
- Floors, corners, and nearby contents protected.
- Children, pets, valuables, and private areas secured.
- Known heat, electrical, material, pest, and structural hazards disclosed.
- Photography and dust-control plan agreed.
- Post-visit condition and cleanup checked.
Limitations and safety notes
This article does not determine whether an attic, ladder, structure, insulation, air, or electrical system is safe. Attics may contain fall, heat, respiratory, biological, fire, and electrical hazards. Homeowners should not enter, walk framing, disturb suspect materials, or handle exposed systems to prepare access. Use qualified roofing, building, environmental, pest, or electrical professionals as conditions require.
FAQ
Does a roofer always need attic access?
No. It depends on the problem and scope. Ask what interior observation would add.
Should I empty the whole attic?
Not automatically. Confirm the required path and work area, then move only what can be handled safely.
Can the contractor use my ladder?
Ask in advance. Many providers use their own inspected equipment and may decline household ladders.
What if I suspect asbestos or mould?
Do not disturb it. Tell the contractor and seek qualified assessment under current local guidance.
Evidence notes
This guide applies common access-management controls: defined purpose, clear route, contractor-supplied equipment, hazard disclosure, privacy protection, before photos, dust containment, and condition checks. It does not certify attic entry or materials.
Next steps
Send the contractor a photo of the closed hatch and route, ask for required clearance and equipment, then clear only the approved path. Make a before photo set and disclose every known hazard before the appointment.




 Hernandez & Sons Roofing4.0 (34 reviews)
 Miller & Sons Roofing & Remodeling4.0 (34 reviews)
 Colonial Remodeling LLC3.0 (6 reviews)
 Dream Home Roofers5.0 (245 reviews)
 EXTERIORS ASSOCIATES INC. Our 25th Year!0.0 (0 reviews)
 Alb Best Way Construction5.0 (66 reviews)
 How to Install Roof Flashing on a Roof with a Combination of Steep and Flat Sections
 How to Clean Solar Panels on a Roof Without Damaging Shingles or Voiding Warranties
 How to Choose a Roofing Contractor That Specializes in Complex Historic Restoration
 How to Choose a Roofing Material That Compliments Your Siding
 The Pros and Cons of a Modified Bitumen (Mod Bit) Roof
 Rubber Roofing for Flat Roofs EPDM vs TPO vs PVC Comparison Guide